Set up GitHub SSH connection on VPS
-
Terminal commands:
- Generate SSH key pair:
ssh-keygen -t rsa -b 2048 - Navigate to SSH directory:
cd ~/.ssh/ - View public key:
cat id_rsa.pub - Copy the entire public key content (starts with ssh-rsa)
- Go to GitHub Settings → SSH and GPG Keys
- Click "New SSH Key"
- Paste key and save
- Test connection:
ssh -T git@github.com
Important Notes
- Run
eval "$(ssh-agent -s)"in each new session - Use SSH URLs for Git operations
Enable Firewall Using UFW
-
Terminal Command:
-
sudo ufw enable -
Press
yand hitEnter
Allow Applications Through UFW
- List available applications:
sudo ufw app list(to view available apps) - Allow an application (e.g., OpenSSH):
sudo ufw allow OpenSSH(replace "OpenSSH" with your desired app)
Resolve Python Access Issue on VPS
Error Message

-
Terminal Command:
sudo chmod +x /usr/bin/python3
Run pgAdmin in Docker
-
docker run -p 5050:80 -e "PGADMIN_DEFAULT_EMAIL=admin@admin.com" -e "PGADMIN_DEFAULT_PASSWORD=admin" -d dpage/pgadmin4 -
Navigate to http://159.65.145.88:5050 to access pgAdmin.
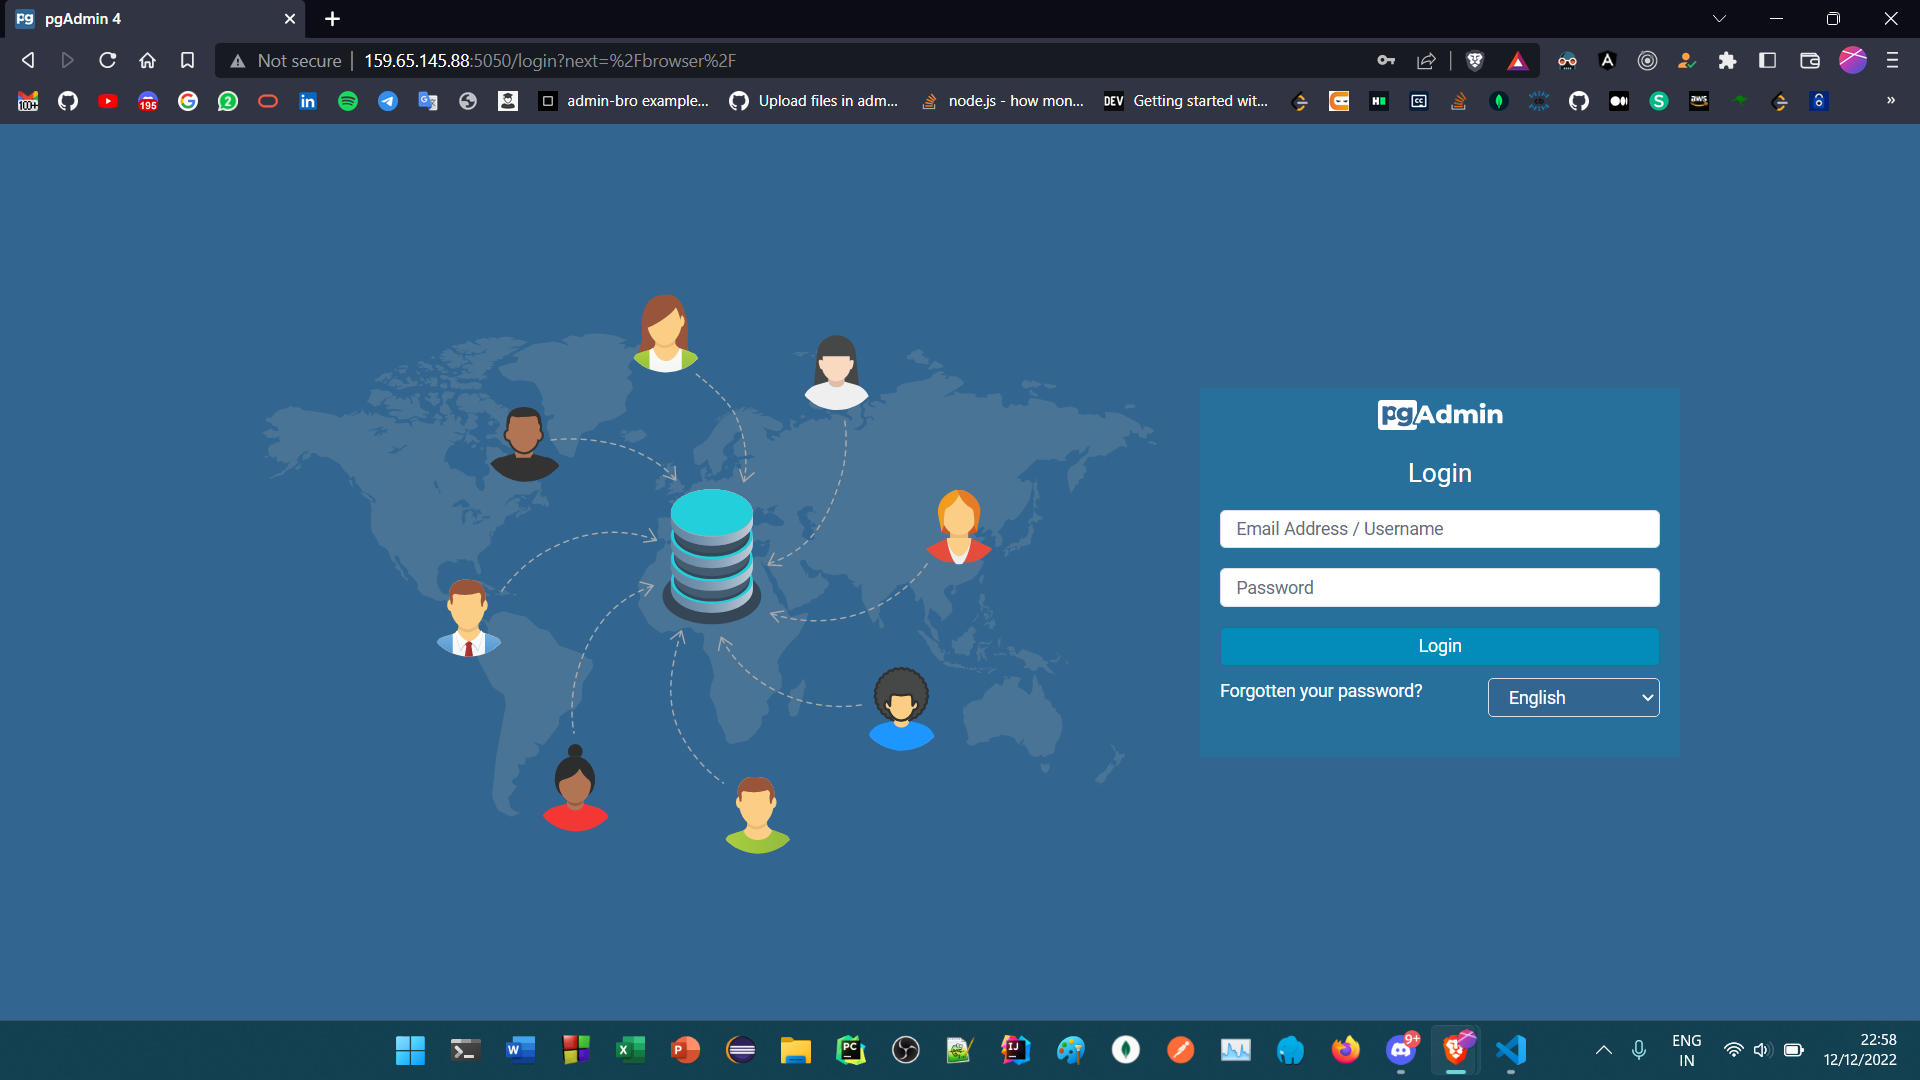
- Enter the email and password specified in Point 1.
Connect Local PostgreSQL to pgAdmin4 in Docker
-
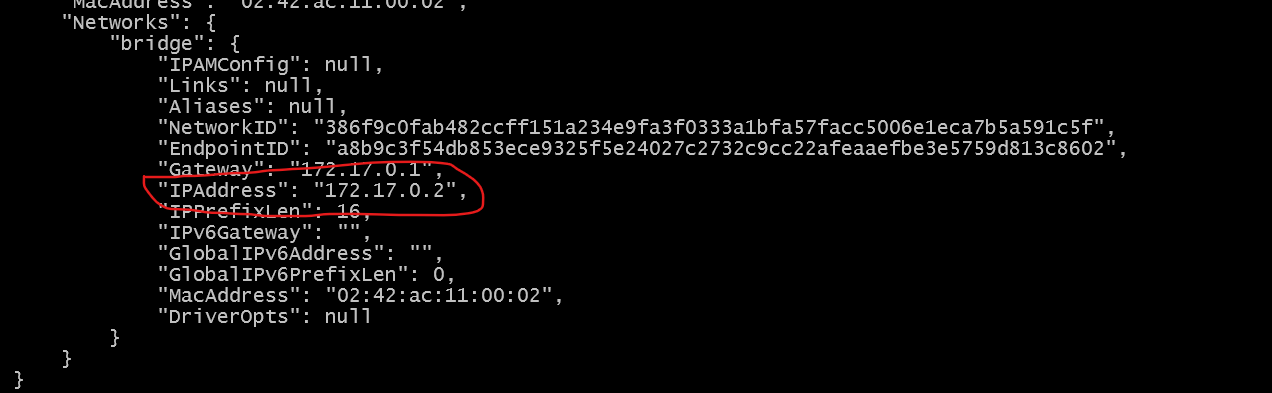
Retrieve Docker Container IP:
docker ps

-
docker inspect <container_id>(replace <container_id> with your actual container ID) -
Scroll down to the Network section.
-
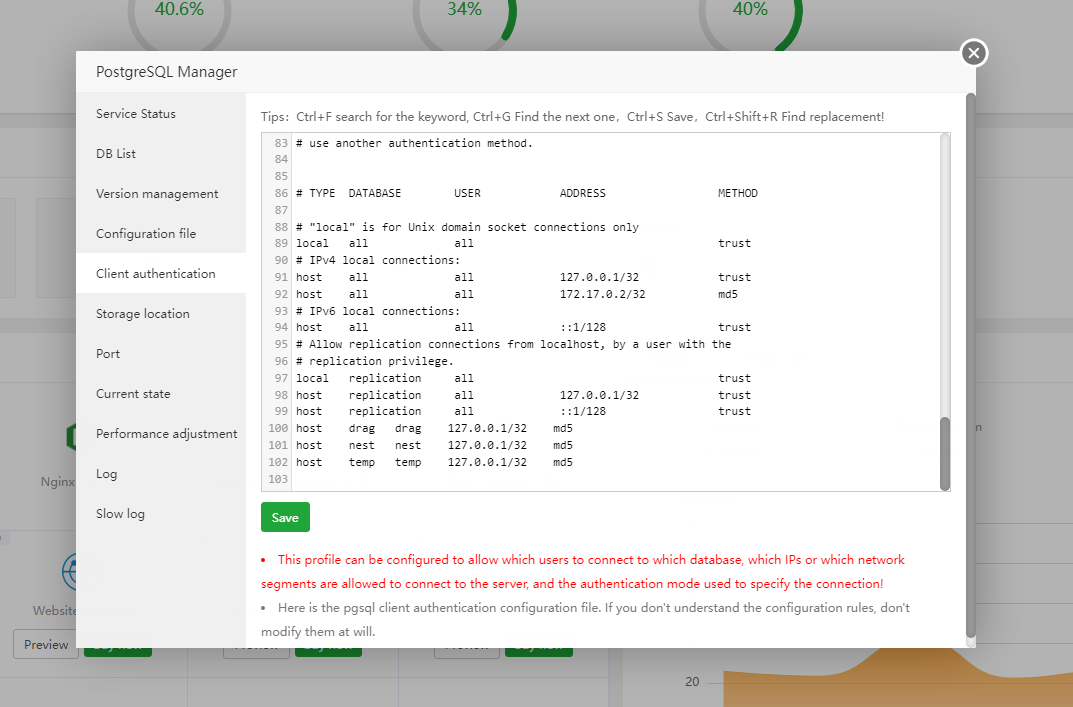
Add the following line to your
pg_hba.conffile:
host all all 172.17.0.2/32 md5(ensure you add "/32" for IPv4 or "/128" for IPv6)
-
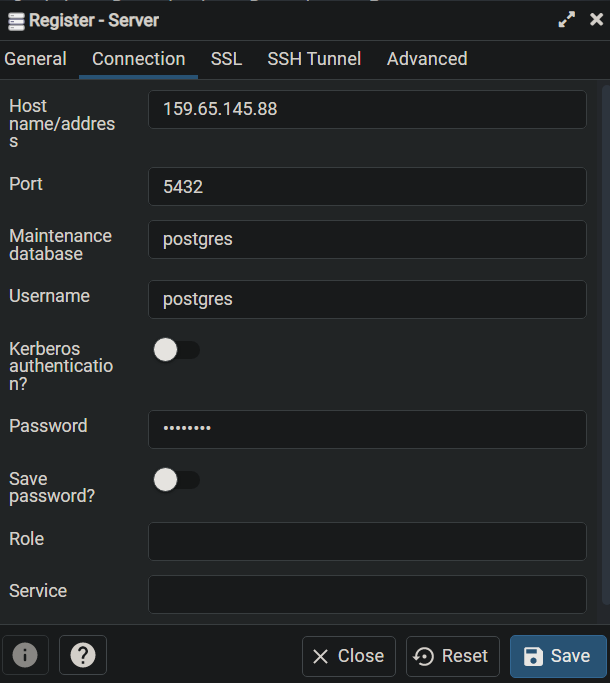
Click on Add Server, enter your server IP address, select a
database, and
provide the database password. (Using a super user account is recommended)
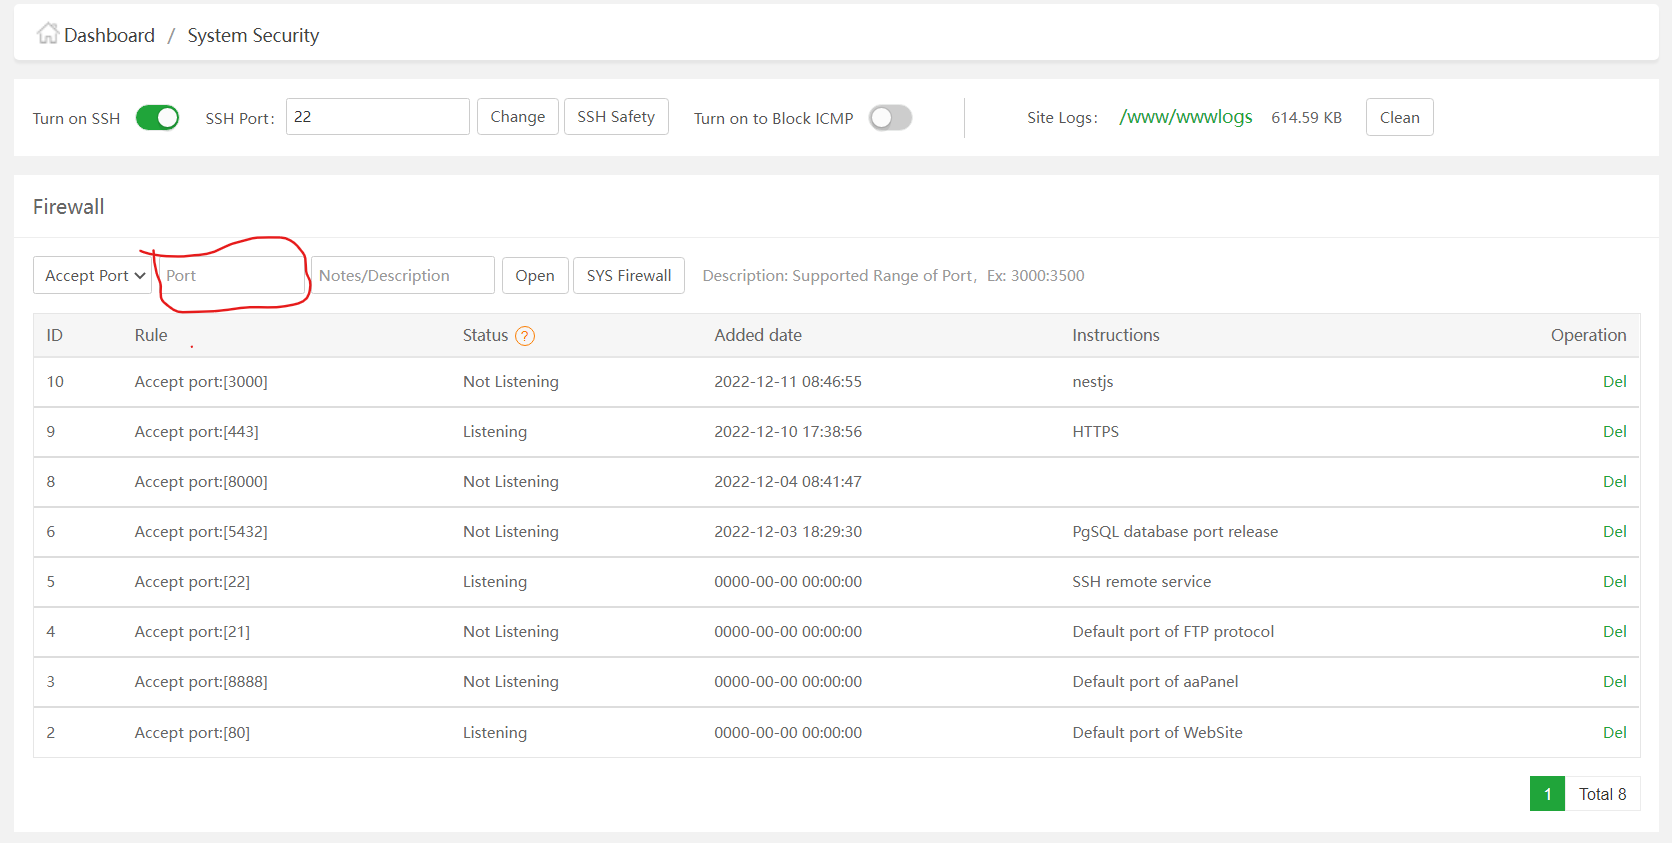
Free Up a Port in aaPanel
-
Navigate to Security > Firewall, add the desired
port, and click the
Open button.
Add a New User to VPS
-
Terminal Commands:
adduser user_name(Replaceuser_namewith the desired username. You will be prompted to enter a password and additional information.)adduser user_name sudo(Grant sudo privileges to the new user)
Access PostgreSQL in Terminal
-
Terminal Commands:
su - postgrespsql
Essential PostgreSQL Commands
\l(List all databases)\q(Quit PostgreSQL)
Set Up Go (Golang)
- Create a project directory and navigate into it:
- Open the terminal in that directory. Terminal Commands:
wget https://go.dev/dl/go1.19.4.linux-amd64.tar.gztar -xvf golang_download_file_name.tar.gz(Replacegolang_download_file_name.tar.gzwith the actual file name)sudo mv go /usr/local(Move Go to the local directory)
Miscellaneous Tips
- UFW (Uncomplicated Firewall)
- Linux systems automatically create a tmp folder after booting.
- Location of the tmp folder: root directory. (If not found, type
cdand pressEnterto navigate to the tmp folder) - Navigate inside the tmp folder.
PostgreSQL Installation and Setup
sudo apt update && sudo apt -y full-upgradesudo rebootsudo apt updatesudo apt install curl gpg gnupg2 software-properties-common apt-transport-https lsb-release ca-certificatescurl -fsSL https://www.postgresql.org/media/keys/ACCC4CF8.asc | sudo gpg --dearmor -o /etc/apt/trusted.gpg.d/postgresql.gpgecho "deb http://apt.postgresql.org/pub/repos/apt/ $(lsb_release -cs)-pgdg main" | sudo tee /etc/apt/sources.list.d/pgdg.listsudo apt updatesudo apt install postgresql-13 postgresql-client-13
Configure PostgreSQL for Remote Connections
- Edit PostgreSQL configuration:
sudo nano /etc/postgresql/13/main/postgresql.conf(replace "13" with your PostgreSQL version) -
In
postgresql.conf, setlisten_addressesto your VPS IP address. For example:listen_addresses = '192.168.10.11' - Save and close the file.
- Edit
pg_hba.conf:sudo nano /etc/postgresql/13/main/pg_hba.conf -
Change the host entry from:
# Accept from anywhere host all all 0.0.0.0/0 md5To:# Accept from trusted subnet host all all 10.10.10.0/24 md5 - Save and close
pg_hba.conf. sudo systemctl restart postgresql
GitHub CI/CD Packages for VPS Deployment
- SSH Action for GitHub
- SSH Key Action for GitHub Reference Video Watch Here
CI/CD Boilerplate
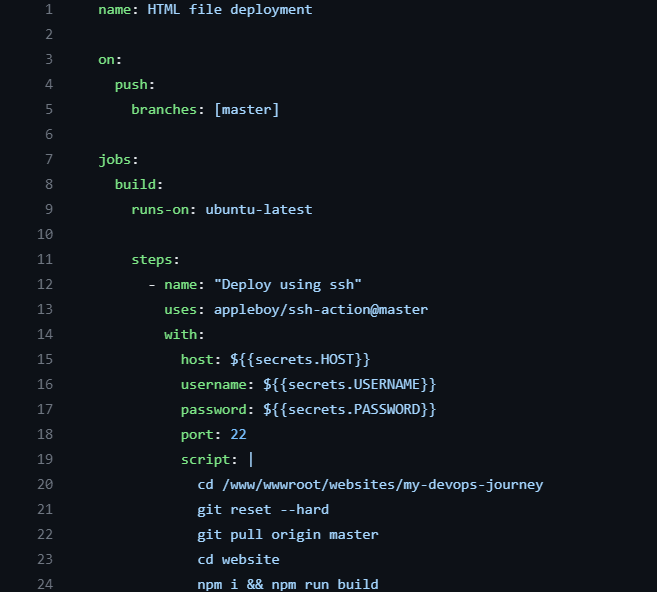
- Variables formatted as ${{ variable_name }} can be stored in the repository's Settings under Secrets and Variables in the Actions section. Create Variables
- In the Actions section of Secrets and Variables, click
on New
Repository Secret, then enter a Name and
Secret.
Example: Name: HOST Secret: localhost - Access your secret key using ${{ secrets.HOST }}
Check Running Service Status
systemctl status <service_name>(e.g., nginx, mysql)systemctl restart <service_name>systemctl stop <service_name>
Angular Configuration for Nginx
-
                        location / {
                            # First attempt to serve request as file, then
                            # as directory, then redirect to index(angular) if no file found.
                            try_files $uri $uri/ /index.html;
                        }
Resolve "node: Permission Denied" Error
sudo chmod 777 -R Your_Dir/(ReplaceYour_Dirwith your directory)
Deploy a Static Website
sudo apt install nginxsudo ufw app list(to check if Nginx HTTP and Nginx HTTPS exist)sudo ufw enablesudo ufw allow 'Nginx HTTP'sudo ufw allow 'Nginx HTTPS'systemctl status nginx(to check Nginx status)sudo mkdir -p /var/www/html/your_foldersudo chown -R $USER:$USER /var/www/your_foldersudo chmod -R 755 /var/www/your_foldersudo nano /etc/nginx/sites-available/your_domain-
Configure Nginx by replacing
your_folderwith your directory andyour_domainwith your domain name. Ignore sections managed by Certbot.server { root /var/www/your_folder; index index.html index.htm index.nginx-debian.html; server_name your_domain; location / { try_files $uri $uri/ /index.html; } listen [::]:443 ssl ipv6only=on; # managed by Certbot listen 443 ssl; # managed by Certbot ssl_certificate /etc/letsencrypt/live/path/fullchain.pem; # managed by Certbot ssl_certificate_key /etc/letsencrypt/live/path/privkey.pem; # managed by Certbot include /etc/letsencrypt/options-ssl-nginx.conf; # managed by Certbot ssl_dhparam /etc/letsencrypt/ssl-dhparams.pem; # managed by Certbot } server { if ($host = your_domain) { return 301 https://$host$request_uri; } # managed by Certbot listen 80; listen [::]:80; server_name your_domain; return 404; # managed by Certbot } sudo ln -s /etc/nginx/sites-available/your_domain /etc/nginx/sites-enabled/sudo nginx -t
Deploy a Node.js Application
- Run your Node.js backend.
- Update Nginx configuration as shown below, replacing
http://localhost:3000/with your application's URL. -
server { server_name nodejs.your_domain.com; location / { proxy_set_header X-Real-IP $remote_addr; proxy_set_header X-Forwarded-For $proxy_add_x_forwarded_for; proxy_set_header Host $host; proxy_set_header X-NginX-Proxy true; proxy_pass http://localhost:3000/; proxy_redirect http://localhost:3000/ https://$server_name/; } listen 443 ssl; # managed by Certbot ssl_certificate /etc/letsencrypt/live/path/fullchain.pem; # managed by Certbot ssl_certificate_key /etc/letsencrypt/live/path/privkey.pem; # managed by Certbot include /etc/letsencrypt/options-ssl-nginx.conf; # managed by Certbot ssl_dhparam /etc/letsencrypt/ssl-dhparams.pem; # managed by Certbot } server { if ($host = your_domain) { return 301 https://$host$request_uri; } # managed by Certbot listen 80; server_name your_domain; return 404; # managed by Certbot } - Ensure your Node.js app is running on port
3000or update the proxy settings accordingly.
Add Free SSH with Certbot
sudo apt install snapdsudo snap install --classic certbot- Run
certbotin your terminal: - You will see a list of hosted websites. Select the desired site and generate an R3 SSL certificate.